In our test kitchen, we focused on the structural mechanics of the shortbread base to prevent the common issue of the cookie collapsing under the weight of the fruit filling. We discovered that by using exactly one egg yolk instead of a whole egg, we could achieve a dense, tender crumb that maintains its shape during the bake. This precision prevents the jam from seeping into the dough, which would otherwise compromise the texture of the finished Apricot Thumbprint 2.

These cookies represent a breakthrough in flavor balance, where the tart acidity of the apricot preserves interacts with the richness of high-fat salted butter. By controlling the moisture content through precise creaming times, we have created a formula that is both reliable for the home baker and scientifically sound. This recipe provides a sturdy yet delicate vessel for the vibrant fruit center, making it a staple for anyone who values structural perfection in their baking.
The Science of Structural Perfection
You will appreciate this recipe because it solves the classic thumbprint dilemma: the dreaded spreading. By omitting the egg white, we reduce the water content in the dough, which limits steam production and prevents the cookies from puffing out of shape. The resulting shortbread is tight-grained and buttery, providing a crisp contrast to the chewy, concentrated apricot jam. This formula emphasizes a high ratio of fat to flour, which coats the proteins in the flour and inhibits gluten development, guaranteeing a melt-in-your-mouth experience.
Furthermore, the inclusion of a small amount of brown sugar introduces just enough moisture to keep the center tender without sacrificing the stability of the cookie walls. This technical balance means your thumbprints will look as professional as they taste, with clearly defined wells and a consistent golden finish. It is a triumph of ingredient ratios that yields a superior result every time you preheat the oven.
Print
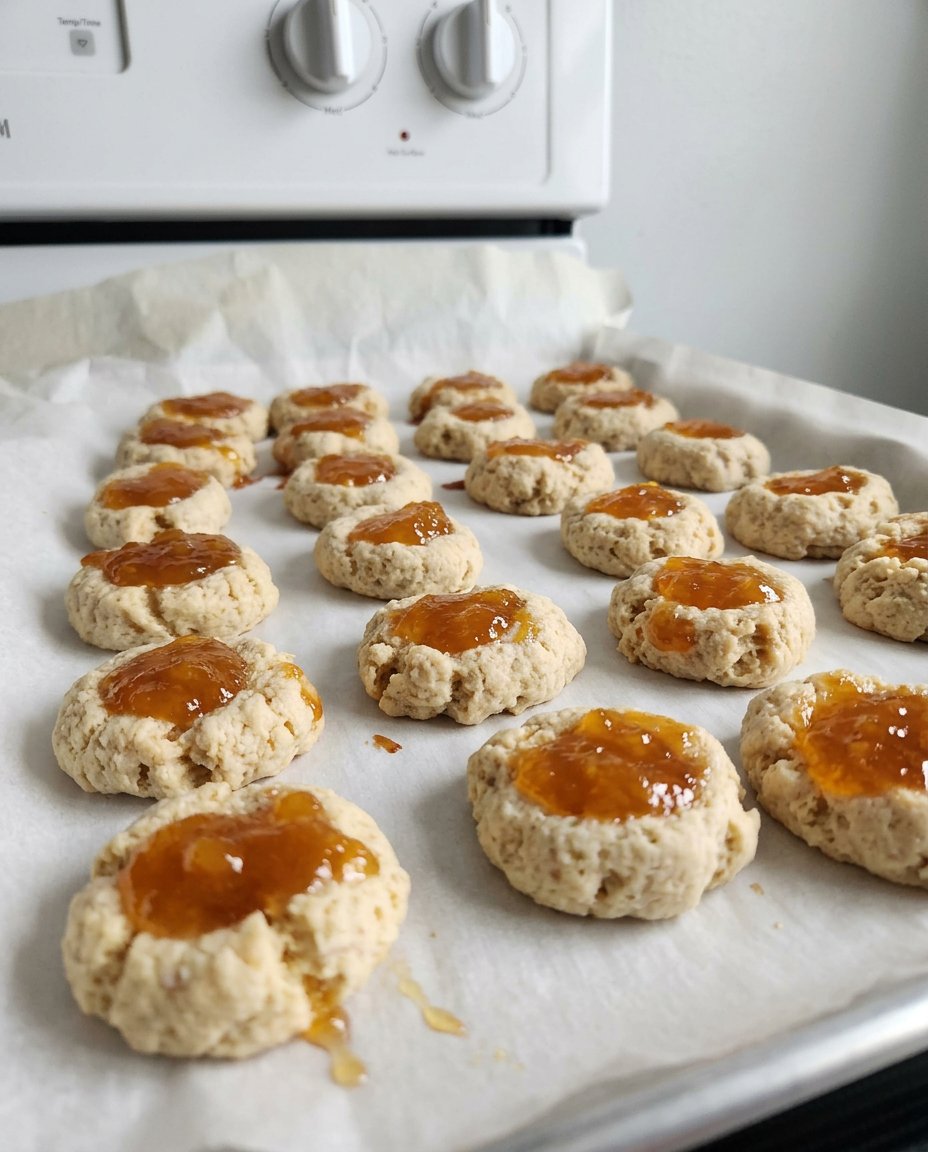
Apricot Thumbprint 2
- Total Time: 27 mins
- Yield: 24 cookies
- Diet: Vegetarian
Description
These buttery shortbread cookies feature a precise ratio of egg yolk to fat, ensuring a sturdy yet tender base for vibrant apricot preserves. Perfect for holiday platters, they offer a professional-grade finish with a balance of sweet and tart flavors.
Ingredients
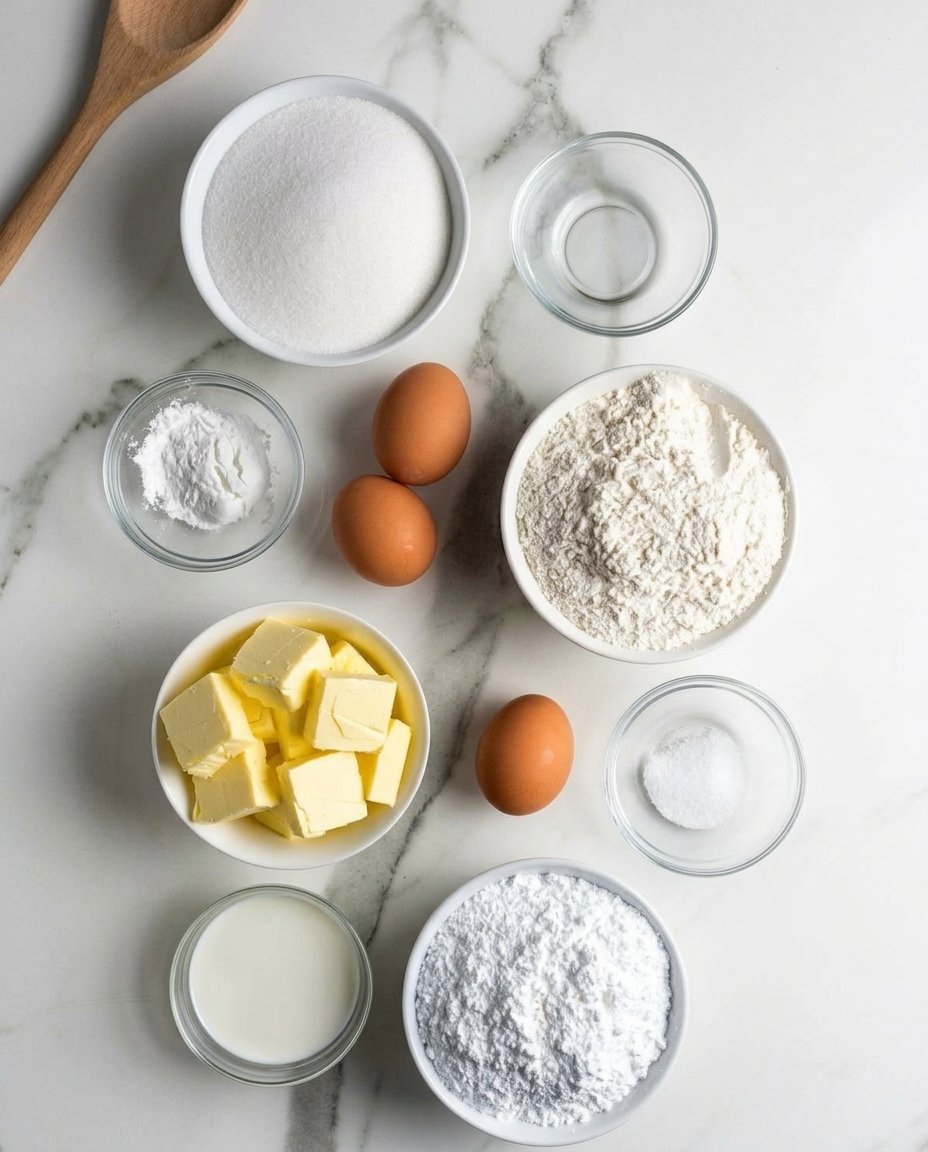
- 1 cup salted butter, softened
- 1/2 cup granulated white sugar
- 1/4 cup packed brown sugar
- 1 large egg yolk
- 1 teaspoon vanilla extract
- 2 cups all-purpose flour
- 1/3 cup apricot jam
Instructions
- Preheat oven to 350°F (177°C) and line baking sheets with parchment paper.
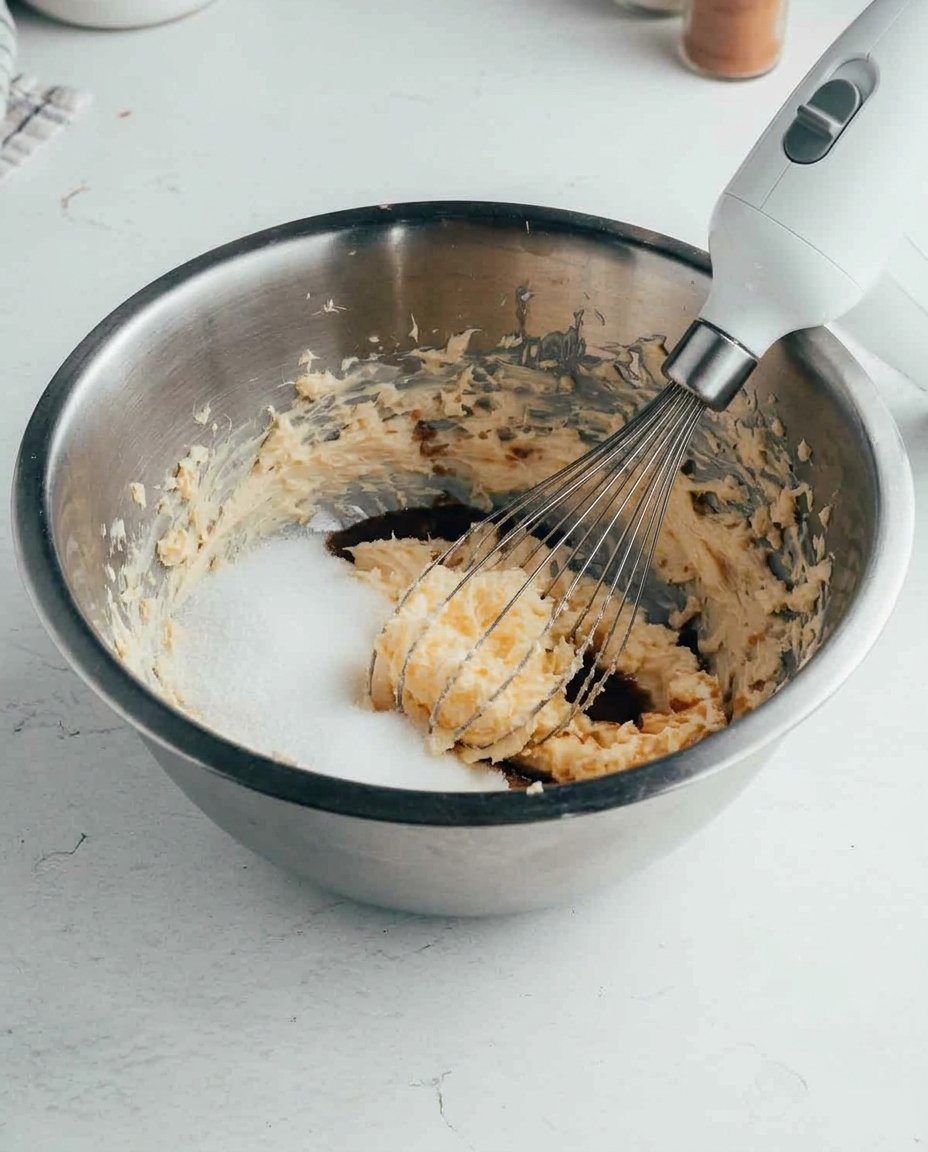
- Cream together softened butter, granulated sugar, and brown sugar on high speed for exactly one minute.
- Add the egg yolk and vanilla extract, then continue creaming on high speed until light and fluffy.
- On low speed, gradually add the flour and mix until white streaks disappear.
- Form 1 tablespoon portions of dough into smooth balls and place them on the baking sheet 2 inches apart.
- Press a deep indent into each ball using a floured spoon or thumb, then fill with 1/2 teaspoon of apricot jam.
- Bake for 10-12 minutes until the edges are golden and jam is bubbling, then let rest for 10 minutes before moving to a wire rack.
Notes
For the best texture, ensure your butter is at room temperature but not melted before starting. If the dough seems too sticky to roll into balls, a quick 15-minute chill in the refrigerator will make it much easier to handle and help the cookies keep their shape.
- Prep Time: 15 mins
- Cook Time: 12 mins
- Category: Dessert
- Method: Baking
- Cuisine: American
The Formula for Flavor and Form
Success in the kitchen begins with understanding how each component contributes to the final chemical structure of the Apricot Thumbprint 2. We have selected these specific measurements to provide the necessary support for the jam while maintaining a delicate bite.
- Salted Butter (1 cup, softened): The primary fat source. We use salted butter to provide a built-in flavor enhancer that cuts through the sweetness of the sugars. It must be softened to approximately 65°F (18°C) to allow for proper air cell distribution during the creaming process.
- Granulated White Sugar (1/2 cup): Provides sweetness and contributes to the crisp edges through caramelization.
- Packed Brown Sugar (1/4 cup): Adds a hint of molasses for depth and introduces hygroscopic properties that keep the cookie from becoming too brittle.
- Egg Yolk (1 large): Acts as the primary emulsifier. The lecithin in the yolk binds the fats and liquids, providing a rich mouthfeel without the leavening power of the white.
- Vanilla Extract (1 teaspoon): A fundamental aromatic that rounds out the buttery notes of the shortbread.
- All-Purpose Flour (2 cups): The structural backbone. We recommend a protein content around 10-11% to maintain the shape of the well during baking.
- Apricot Jam (1/3 cup): High-pectin preserves are ideal here, as they set firmly upon cooling, preventing a sticky mess during storage.
The Scientific Process
Step 1: Emulsifying the Fats and Sugars
Preheat your oven to 350°F (177°C) and line your baking sheets with parchment paper to prevent sticking and manage bottom-heat distribution. In a large mixing bowl, combine the softened butter, granulated sugar, and brown sugar. Use an electric handheld mixer on high speed for exactly one minute. This duration is critical; you are looking to create a stable emulsion where the sugar crystals begin to dissolve into the fat, creating tiny air pockets that will provide the cookie’s lift.
Step 2: Incorporating the Emulsifier and Aromatics
Add the single egg yolk and the vanilla extract to the butter mixture. Continue to cream the mixture on high speed until it appears light and fluffy. This step completes the emulsion, ensuring that the fat and moisture are perfectly suspended. A properly emulsified base prevents the flour from absorbing too much moisture too quickly, which helps in maintaining the desired crumb structure.
Step 3: Integrating the Structural Components
Turn the mixer to its lowest speed and gradually add the all-purpose flour. Mix only until the white streaks of flour disappear. Over-mixing at this stage will activate the gluten proteins, resulting in a tough, bread-like cookie rather than a tender shortbread. The dough should be soft but cohesive enough to handle without excessive sticking.
Step 4: Forming the Cookie Spheres
Scoop the dough into 1 tablespoon portions (approximately 15-18 grams each) and roll them between your palms to form smooth, uniform balls. Smoothness is essential to prevent cracking when the well is created. Place the spheres on the prepared baking sheet, leaving at least 2 inches (5 cm) of space between each to allow for thermal circulation during the baking process.
Step 5: Creating the Precision Wells
Use a well-floured round 1/2 teaspoon measuring spoon or your thumb to press a deep indent into the center of each ball. If the edges crack significantly, your dough may be too cold; simply pinch the cracks back together. Fill each well with approximately 1/2 teaspoon of apricot jam. Do not overfill, as the jam will expand and bubble as it reaches its boiling point in the oven.
Step 6: Thermal Transformation and Cooling
Bake the cookies one sheet at a time for 10-12 minutes. You are looking for a subtle golden hue on the bottom edges and jam that is visibly bubbling, indicating the pectin has been activated. Let the cookies rest on the baking sheet for at least 10 minutes. This carry-over cooking time allows the starch structure to set and the jam to firm up before the cookies are moved to a wire rack for final cooling.
Lauren’s Lab Notes for Success
For the most precise results, I recommend weighing your flour rather than using volume measurements; 2 cups of all-purpose flour should weigh exactly 240 grams. If the dough feels too soft to roll, refrigerate it for 15 minutes to allow the butter to firm up, which will help maintain the depth of the thumbprint well. When choosing your filling, look for a preserve that lists fruit as the first ingredient to maximize flavor density. For more foundational techniques, see our guide on Effortless Cookie Elegance. You might also find technical inspiration in the methods used at Knead Some Sweets regarding fruit-to-dough ratios. If you notice your jam is too thin, simmer it in a small saucepan for 5 minutes to reduce the water content before filling the cookies; this prevents the jam from boiling over the edges of your carefully crafted wells.
Tested Structural Variations
If you prefer a citrus-forward profile, you can add one tablespoon of fresh orange zest to the sugar during the creaming stage. Because zest contains oils rather than water, it will not disrupt the delicate moisture balance of the dough. Another tested variation involves replacing the apricot jam with a raspberry or blackberry preserve; just ensure the seed content does not interfere with the volume of the well. For those looking for modern flavor pairings, check our Trending Cookie Creations for seasonal inspiration. If you wish to use a nut-based flour, replace no more than 1/4 cup of the all-purpose flour with finely ground almond flour to maintain structural integrity while adding a nutty dimension to the shortbread base.
Presentation and Flavor Development
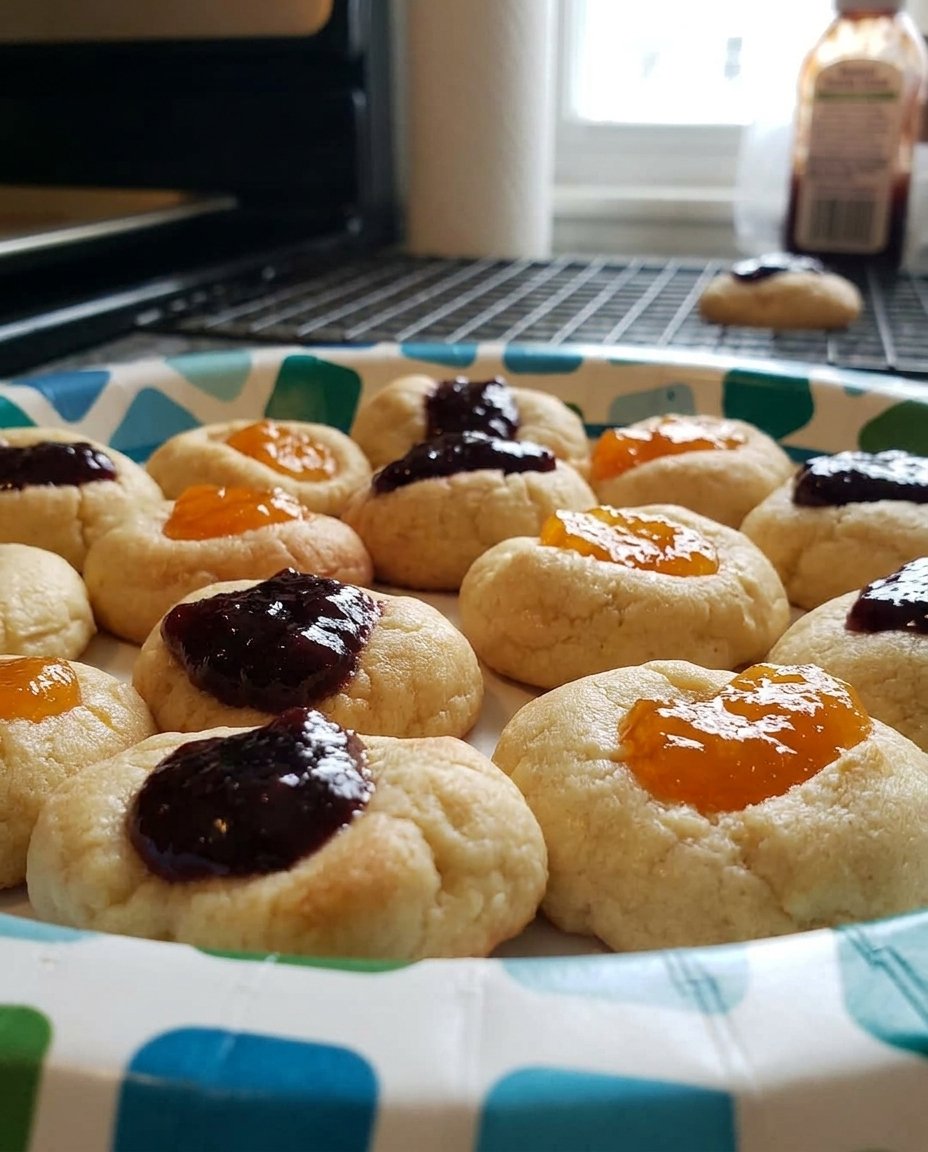
These cookies are best served at room temperature once the jam has completely set into a tacky, jewel-like consistency. The flavors actually develop further after 24 hours as the moisture from the jam slightly softens the immediate surrounding crumb, creating a unique texture gradient. For a professional presentation, consider a light dusting of powdered sugar over the cookies before filling them with jam to maintain the vibrant color of the fruit. For pairing these with other refined treats, browse our Artisan Cookie Collection. They pair exceptionally well with a medium-roast coffee or a light Earl Grey tea, where the bergamot notes complement the stone fruit acidity.
Precision Baking Truths
Mastering the Apricot Thumbprint 2 is a lesson in the importance of fat-to-protein ratios and moisture control. By following these precise scientific steps, you have created a cookie that balances a rich, crumbly base with a concentrated fruit center. We encourage you to continue testing different preserves and zest additions to find your perfect flavor profile while relying on this tested structural foundation. Explore more of our design-focused recipes in the Seasonal Cookie Design section. If you found success with this recipe, share your results with our community on Pinterest, Instagram, or Facebook. Keep testing, keep measuring, and enjoy the delicious results of your precision.
