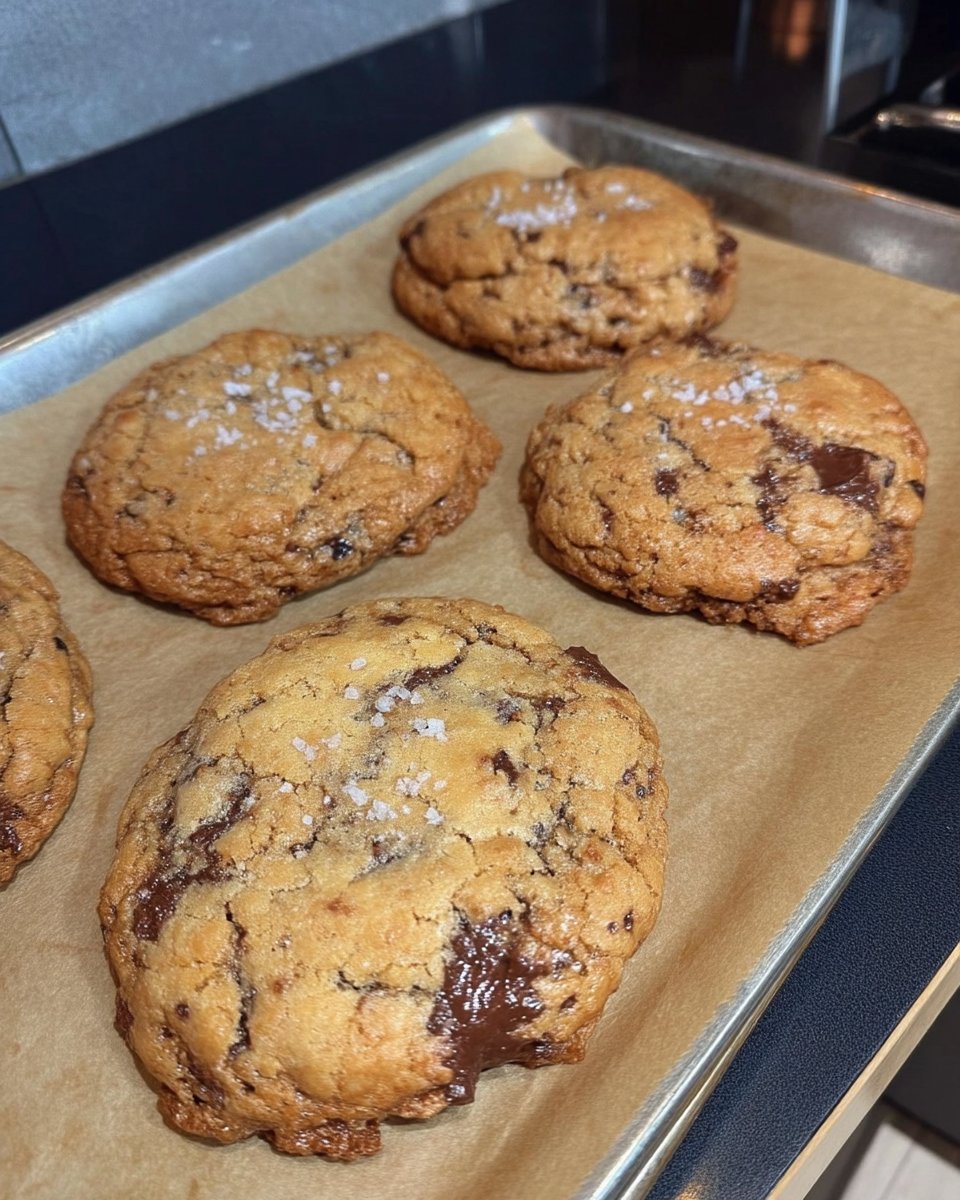
In my family, Sunday afternoons were reserved for the gentle creak of the oven door and the scent of sugar turning to gold. This recipe for thick chocolate chip cookies is a love letter to those quiet Southern traditions where we didn’t just bake a snack, we baked a memory. There is something profoundly grounding about a cookie that feels substantial in your hand, carrying the weight of heritage and a little touch of home.

These aren’t your typical thin, crispy rounds; they are grand, six-ounce portions of comfort that demand a bit of patience and a long rest in the fridge. By letting the dough chill, we allow the flavors to find their heart, resulting in a tender center and a crumb that tells a story of patience and quality ingredients.
Comfort Meets Flavor
You will find that these cookies are the culinary equivalent of a warm hug on a rainy day. What makes this recipe a true keeper is the way it honors the classic 1940s style—large, proud, and unapologetically soft—while adding just a spark of curiosity through the use of toasted sugar and a whisper of nutmeg. It is a familiar favorite that feels just a little more special because of the care we put into the foundation.
The texture is where the magic really happens. Because each cookie is essentially the size of three standard ones, you get a unique contrast between the honey-gold, slightly crisp edges and a middle that stays remarkably tender. It’s a recipe that invites you to slow down and enjoy the process of baking as much as the result. Whether you are sharing these at a local potluck or tucking one into a lunchbox for a surprise treat, they carry a sense of Southern hospitality that is hard to find in a store-bought bag.
Finally, this recipe is incredibly reliable. We have tested the ratios of brown sugar to white sugar to make sure you get that deep, molasses-like warmth without losing the structural integrity that a thick cookie needs. It is comfort food at its most refined, proving that you do not have to choose between tradition and a little bit of flavor innovation.
Print
Thick Chocolate Chip Cookies
- Total Time: 12 hours 42 mins
- Yield: 8 large cookies
- Diet: Vegetarian
Description
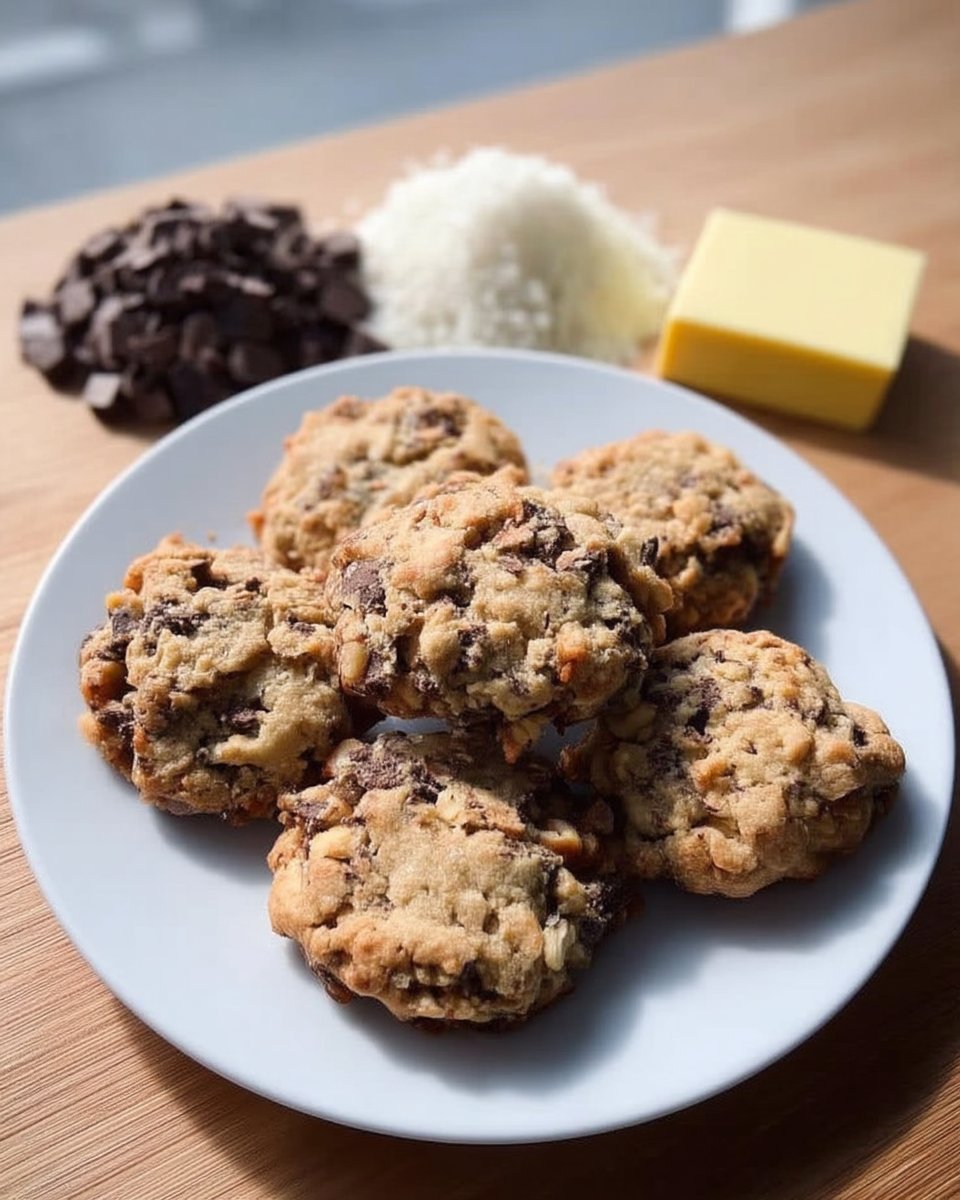
These massive, six-ounce chocolate chip cookies are a tribute to traditional Southern baking, offering a thick, soft texture and a rich, complex flavor profile. With a hint of nutmeg and a long chilling process, they deliver a perfectly set crumb and golden edges that are ideal for sharing.
Ingredients
- 4 ounces unsalted butter, softened to 65°F
- Light brown sugar
- Toasted white sugar
- Vanilla extract
- Diamond Crystal Kosher salt
- Baking powder
- Baking soda
- Pinch of ground nutmeg
- 2 large eggs, cold
- All-purpose flour
- 15 ounces assorted chocolate chips
- Raw walnuts or pecans, chopped
Instructions
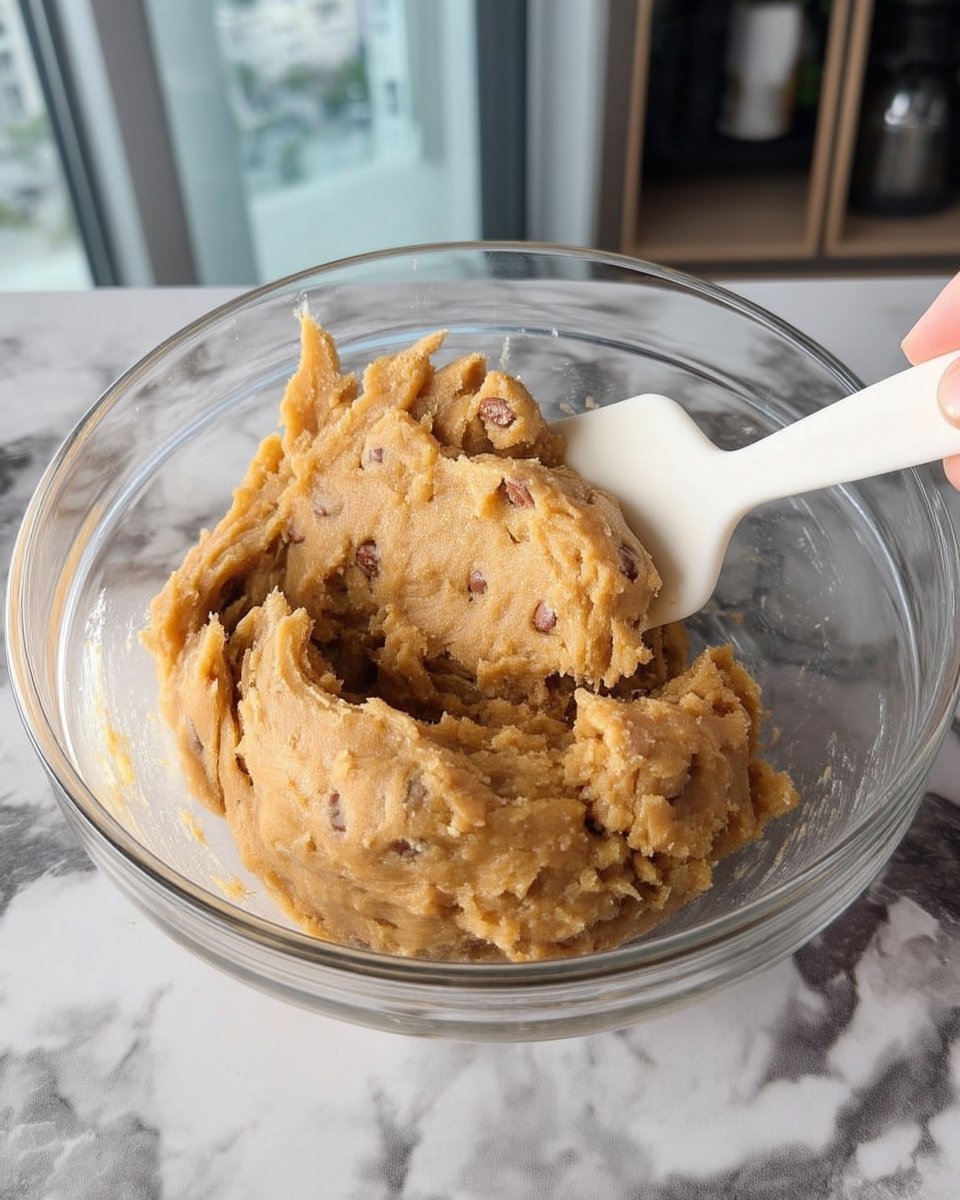
- In a stand mixer fitted with a paddle attachment, combine butter, brown sugar, toasted sugar, vanilla, salt, baking powder, baking soda, and nutmeg on low, then increase to medium and beat for 8 minutes until pale and fluffy.
- Add the cold eggs one at a time while mixing on medium speed, ensuring each is fully incorporated before adding the next.
- Reduce speed to low, add all the flour at once and mix until just combined, then fold in the chocolate chips and nuts until evenly distributed.
- Portion the dough into 8 balls of approximately 6 ounces each, wrap them individually in plastic, and refrigerate for at least 12 hours.
- Preheat the oven to 350°F (180°C) and bake the cold dough balls on a parchment-lined baking sheet for 22 minutes until the internal temperature is between 175-185°F.
- Let the cookies cool on the pan for 20 to 30 minutes until they reach about 100°F before serving.
Notes
For the best results, use a kitchen scale to ensure each cookie portion is exactly six ounces, which helps them bake evenly. If you prefer a nut-free cookie, you can substitute the walnuts with an equal weight of extra chocolate chips or toasted seeds. Remember that chilling the dough is not optional; it is the key to achieving the height and thickness characteristic of this 1940s-style recipe.
- Prep Time: 12 hours 20 mins
- Cook Time: 22 mins
- Category: Dessert
- Method: Baking
- Cuisine: American
Familiar Ingredients
To make these cookies truly stand out, we focus on the quality and temperature of every component. The base starts with four ounces of unsalted American butter, softened to about 65°F (18°C). This specific temperature is vital because it allows the butter to hold air during the creaming process, which provides the lift and fluffiness we want in a substantial cookie. We then mix in a combination of light brown sugar for moisture and toasted white sugar for a subtle caramel-like depth that feels like a secret family secret.
- Assorted Chocolate Chips: We use 15 ounces of chips rather than chopped chocolate. Chips are designed to hold their shape and provide structure to the dough, whereas chopped chocolate can melt into the batter and cause the cookies to spread too much.
- Diamond Crystal Kosher Salt: This salt has a hollow, light structure that seasons the dough beautifully without making it overly salty. If you are using table salt, remember to use only half as much by volume.
- A Pinch of Nutmeg: This is Jesse’s signature touch. It doesn’t make the cookie taste like spice cake; it simply provides a warm, earthy background note that makes the chocolate taste richer.
- Large Eggs: Use these straight from the fridge. The cold temperature helps keep the dough cool during the mixing process, which is essential for maintaining that thick, puffed shape later on.
- Raw Walnuts or Pecans: These add a wonderful crunch and a buttery flavor that complements the chocolate chips perfectly. I prefer pecans for a true Southern feel, but walnuts are the classic choice for a reason.
- All-Purpose Flour: A reliable brand like Gold Medal provides the exact amount of protein needed to give these cookies their structure without making them tough or bread-like.
The Comfort Method
Step 1: Cream the Base
Start by placing your softened butter, light brown sugar, toasted white sugar, vanilla extract, salt, baking powder, baking soda, and that tiny pinch of nutmeg into the bowl of a stand mixer. Using the paddle attachment, mix on a low speed just to get things moving. Once the sugars are moistened, increase the speed to medium and beat the mixture for about 8 minutes. You want it to look soft, fluffy, and very pale. Don’t forget to pause halfway through to scrape down the sides of the bowl so every bit is perfectly incorporated.
Step 2: Incorporate the Eggs
With the mixer still running on medium, add your cold eggs one at a time. It is important to let each egg fully disappear into the batter before you drop in the next one. This helps build a strong emulsion, which leads to a better rise in the oven. Once the eggs are in, you’ll see the batter become even more velvety and smooth.
Step 3: Mix in the Dry Ingredients and Add-ins
Turn the mixer down to its lowest setting and pour in all of the flour at once. Mix just until you see no more streaks of white. Immediately add your assorted chocolate chips and nut pieces. Keep the mixer on low and let it run only until the chips and nuts are evenly distributed throughout the dough. Overmixing at this stage can lead to a tough cookie, so keep a close eye on it.
Step 4: Portion and Chill
This is the secret to the “1940s tradition” feel. Divide your dough into 8 equal portions, which should be about 6 ounces each. These are large! Round each portion into a smooth, handsome ball. Wrap them individually in plastic wrap and place them in the refrigerator. You must let them chill for at least 12 hours. This rest period allows the flour to fully hydrate and the fats to solidify, which prevents the cookies from flattening out into pancakes when they hit the heat.
Step 5: The Golden Bake
When you are ready to bake, preheat your oven to 350°F (180°C) and line a sturdy baking sheet with parchment paper. Take your cold dough balls out of the fridge and place up to four of them on the pan, giving them plenty of space. If you’re feeling fancy, a tiny sprinkle of extra salt on top looks beautiful. Bake for about 22 minutes. You are looking for a puffed, lightly brown appearance and an internal temperature between 175 and 185°F. They might look a little soft in the center, but they will firm up as they cool.
Step 6: The Cooling Wait
Let the cookies sit directly on the baking sheet until they have cooled down to about 100°F (38°C). This usually takes about 20 to 30 minutes. This patience is rewarded with a texture that is perfectly set. Enjoy them while they are still warm for the best experience.
Flavor Balance
To get the best results, I highly recommend using a digital thermometer to check the internal temperature of your cookies. It is the most reliable way to make sure you have that perfect balance between a baked edge and a soft, molten center. Also, pay close attention to the temperature of your butter; if it gets too greasy or warm, the cookies won’t hold those beautiful air bubbles we worked so hard to create during the creaming stage. For more ideas on perfecting your technique, take a look at our Artisan Cookie Collection where we discuss the science of crumb structure. Remember that these cookies are best when the dough is very cold, so don’t take them out of the fridge until the oven is fully preheated. For a deeper look at the science of these thick treats, check out this guide on super thick chocolate chip cookies.
Other Spice Ideas
While the hint of nutmeg is my personal favorite, you can easily adapt this recipe to suit your own taste for adventure. If you want a more floral note, try swapping the vanilla extract for vanilla bean paste or even a teaspoon of ground cardamom for a gentle twist. For those who love a bit of zest, a tablespoon of fresh orange zest mixed into the sugar provides a bright contrast to the dark chocolate chips. You can also look through our Seasonal Cookie Design category for inspiration on how to adjust toppings based on the time of year. If you prefer a nut-free version, simply replace the walnuts with more chocolate chips or some toasted sunflower seeds to keep that crunch without the allergens.
Cozy Enjoyment

There is nothing quite like serving one of these massive cookies alongside a cold glass of whole milk or a steaming mug of black coffee. Because they are so rich, they are perfect for sharing; I often cut them into quarters to serve as part of a larger dessert platter. If you are looking for ways to present your treats with a touch of Southern hospitality, our Effortless Cookie Elegance guide has wonderful suggestions for styling. For a truly decadent experience, serve a warm cookie with a small scoop of vanilla bean ice cream on top and a light drizzle of salted caramel.
The Comfort Truth
Baking these thick chocolate chip cookies is more than just a kitchen task; it is a way to bring a piece of history and a whole lot of heart into your home. The way the kitchen fills with the scent of toasted sugar and melting chocolate is a simple joy that never gets old. We hope this recipe becomes a new Sunday tradition for your family, just as it has for ours. To see what other bakers are making this season, visit our Trending Cookie Creations page. Don’t forget to share your bakes with us on Pinterest, Instagram, and Facebook. Happy baking, and may your kitchen always be filled with warmth!
