Growing up in the South, we always had a jar of something sweet on the counter, usually a classic that everyone knew by heart. These Oreo Copycat Cookies remind me of those simple times, but with a deep, dark cocoa richness that feels just a bit more special. It’s about taking that familiar crunch we all love and giving it the care of a homemade touch that makes every bite feel like a treasure.

This recipe captures that iconic dark chocolate snap and creamy center without any of the mystery ingredients found in the grocery store aisle. By using quality cocoa and a steady hand, you can create a sandwich cookie that tastes exactly like home should. It is a wonderful way to bring a bit of nostalgia into your kitchen while treating your family to something truly authentic.
A Classic Twist for Your Cookie Jar
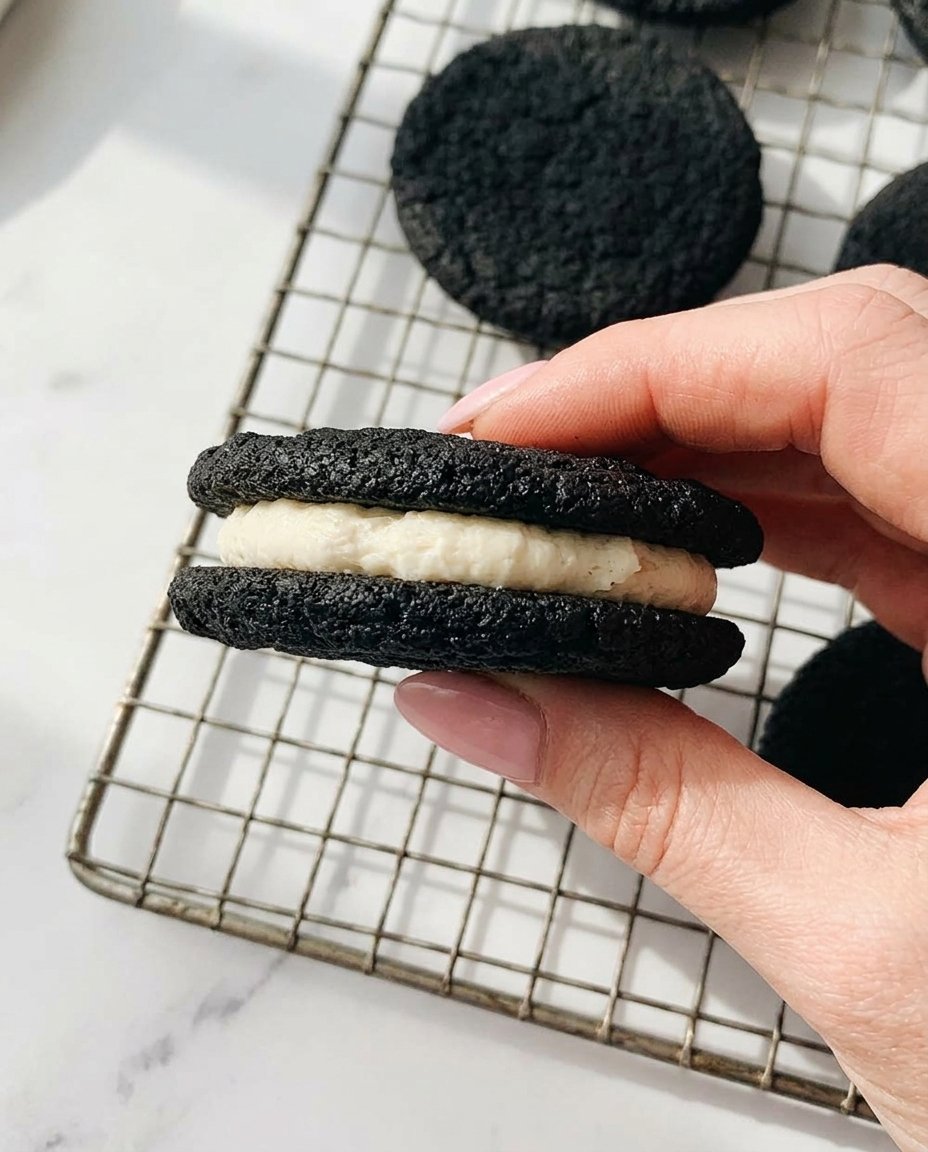
There is something deeply comforting about a chocolate sandwich cookie. It’s the kind of treat that spans generations, bringing together the young and the young at heart. When you make these Oreo Copycat Cookies at home, you’re not just following a recipe; you’re recreating a memory with better ingredients and a whole lot of love. The dark, almost bitter chocolate of the wafer perfectly balances the sweet, buttery vanilla cream inside, creating a harmony that store-bought versions just can’t match.
You’ll love how the texture of these cookies turns out. They have that signature crispness that holds up to a long soak in a glass of cold milk, yet they remain tender enough to enjoy on their own. This is a reliable, tested recipe that brings a bit of magic to your baking routine. Whether you are making them for a school bake sale or just a quiet Sunday afternoon, these cookies carry a sense of warmth and hospitality that defines Southern baking. Plus, being able to control the amount of filling—hello, triple-stuffed!—makes the whole process a lot of fun.
Print
Oreo Copycat Cookies
- Total Time: 45 mins
- Yield: 12 sandwich cookies
- Diet: Vegetarian
Description
Recreate the iconic crunch and creamy center of your favorite store-bought sandwich cookies right in your own kitchen. These homemade treats feature a deep, dark cocoa wafer balanced by a silky vanilla frosting for a nostalgic bite that pairs perfectly with a cold glass of milk.
Ingredients
- 1 1/4 cups all-purpose flour
- 1/2 cup unsweetened black cocoa powder or Dutch-process cocoa
- 1 teaspoon baking soda
- 1/4 teaspoon baking powder
- 1/4 teaspoon salt
- 1 cup granulated sugar
- 1/2 cup unsalted butter, room temperature
- 1 large egg
- 1/2 cup unsalted butter, room temperature (for filling)
- 2 cups powdered sugar, sifted
- 2 teaspoons pure vanilla extract
- 1 pinch fine sea salt
Instructions
- Preheat your oven to 375°F (190°C) and line two large baking sheets with parchment paper.
- In a food processor or the bowl of a stand mixer, combine the flour, cocoa powder, baking soda, baking powder, salt, and sugar until evenly integrated.
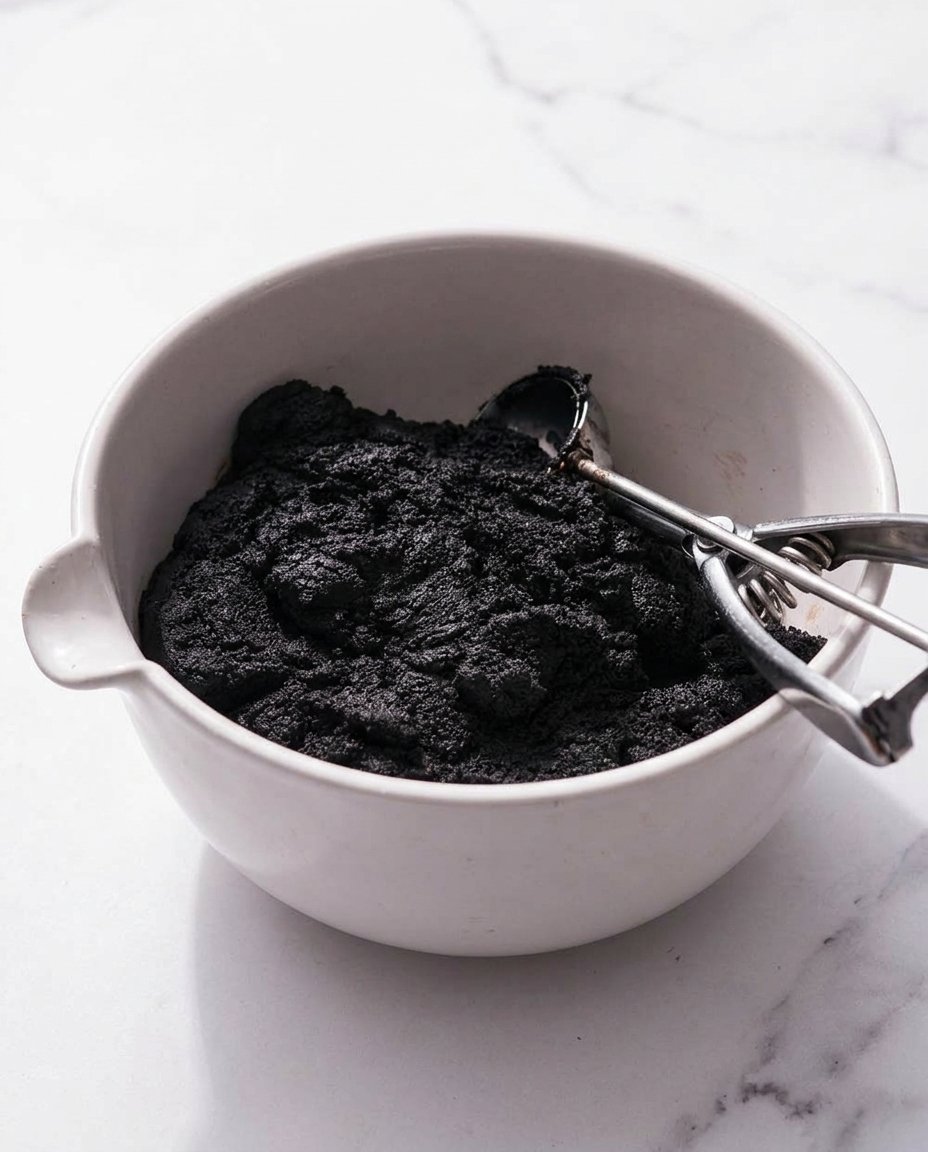
- With the mixer on low, add chunks of butter until the mixture resembles small crumbs, then add the egg and mix until a dark dough forms into a single mass.
- Scoop 1-tablespoon sized portions and roll into balls, placing them 2 inches apart on the prepared sheets.
- Dampen your palm slightly and press each ball down until it is about 1/8-inch thick.
- Chill the baking sheets in the refrigerator for 10 minutes to ensure the cookies maintain their classic shape.
- Bake for 9 to 10 minutes, rotating the pans halfway through, then let them cool completely on a wire rack.
- For the filling, beat the butter and vanilla until creamy, then gradually add sifted powdered sugar and salt, beating on high for 2-3 minutes until fluffy and white.
- Pipe or spoon the filling onto the flat side of one cookie and press another on top until the cream reaches the edges.
Notes
For the most authentic appearance and flavor, search for black cocoa powder which provides the signature dark hue and lower acidity typical of a sandwich cookie. If you find the dough sticking while flattening, use the bottom of a glass dipped in a little extra cocoa powder to prevent sticking and ensure a perfectly flat surface.
- Prep Time: 25 mins
- Cook Time: 10 mins
- Category: Dessert
- Method: Baking
- Cuisine: American
What You’ll Need for That Iconic Snap
To get that deep, dark color and the specific flavor we associate with the world’s most famous sandwich cookie, the ingredients matter. We are focusing on high-quality pantry staples that work together to create a familiar but improved result. Here is a look at what makes these cookies so special:
- Black Cocoa Powder or Dutch-Process Cocoa: This is the secret to the look. Black cocoa gives the cookies that midnight-dark hue and a slightly smoky, chocolatey depth. If you use standard Dutch-process, the cookies will be a lighter brown but still delicious.
- Unsalted Butter: Make sure your butter is at a cool room temperature. This helps the dough come together without becoming too greasy, which keeps the wafers crisp.
- Granulated Sugar: Standard sugar provides the sweetness and contributes to the structural snap of the cookie.
- All-Purpose Flour: This provides the base for our dough, giving it enough body to be rolled and flattened into thin discs.
- Baking Soda and Powder: These provide just enough lift so the cookies aren’t like stones, but stay thin and crunchy.
- Pure Vanilla Extract: For the filling, using a high-quality vanilla makes a world of difference. It provides that aromatic warmth that balances the sugar.
- Powdered Sugar: Sifting your powdered sugar is a small step that makes the filling incredibly smooth and light.
- Sea Salt: A tiny pinch of fine sea salt in both the dough and the filling helps brighten the chocolate and cut through the sweetness of the cream.
The Comfort Method: Step by Step
Step 1: Prepare the Oven and Pans
Before you get your hands in the dough, preheat your oven to 375°F (190°C). This higher temperature helps the cookies set quickly, preserving their shape. Line two large baking sheets with parchment paper so the cookies don’t stick and the bottoms don’t brown too quickly.
Step 2: Mix the Dry Ingredients
In a food processor or the bowl of your stand mixer, combine the flour, cocoa powder, baking soda, baking powder, salt, and sugar. Give it a quick pulse or a low-speed stir to make sure everything is evenly distributed. You want the cocoa to be fully integrated with the flour so there are no streaks.
Step 3: Add the Wet Ingredients
While the mixer is running on low, add the butter chunks one at a time. Once the butter looks like small crumbs, add the egg. Continue to mix until the dough suddenly gathers into a single, dark mass. This should take about a minute. The dough will be thick and slightly tacky, which is perfect for shaping.
Step 4: Shape and Flatten
Use a small cookie scoop to portion out 1-tablespoon sized balls. Place them on your prepared pans about 2 inches apart. Dampen your palm slightly and gently press each ball down until it is about 1/8-inch thick. We want these thin so they get nice and crunchy.
Step 5: The Important Chill
Pop the trays into the refrigerator for at least 10 minutes. This short chilling time makes sure the butter stays firm, preventing the cookies from spreading too much and losing that classic round shape.
Step 6: Bake to Perfection
Bake for 9 to 10 minutes. I like to rotate the pans halfway through to make sure the heat is hitting them evenly. You’ll know they are done when they smell fragrant and feel set to the touch. Let them cool completely on a wire rack before you even think about filling them.
Step 7: Whip Up the Filling
In your stand mixer, beat the butter and vanilla until it looks creamy and pale. Gradually add the sifted powdered sugar and the salt. Once it’s all in, turn the speed up to high and beat for 2-3 minutes. You want it to look light, fluffy, and white as snow.
Step 8: Assembly
Pipe or spoon a dollop of filling onto the flat side of one cookie. Place another cookie on top and press down gently until the cream reaches the edges. Repeat until all your sandwiches are ready to be enjoyed.
Jesse’s Tips for the Perfect Batch
When you are making these Oreo Copycat Cookies, the temperature of your butter is everything. You want it cool enough that it holds its shape but soft enough to blend. If the butter is too warm, the dough will be greasy and the cookies might spread too much. Another secret is the cocoa; if you really want that authentic taste, try to source black cocoa powder. It has a lower acidity and a specific flavor profile that defines the classic sandwich cookie. For more inspiration on building your pantry, check out our Artisan Cookie Collection.
Also, don’t skip the chilling step! It might seem like a small thing, but those ten minutes in the fridge make the difference between a crisp wafer and a soft cookie. For a deeper look into the science of why these ratios work so well, Handle the Heat has wonderful insights on cocoa types. Finally, when flattening the cookies, use a glass with a flat bottom dipped in cocoa powder if you find your hands are sticking too much to the dough.
Classic Options and Flavor Ideas
While the classic vanilla filling is hard to beat, there are so many ways to add a little spark to this recipe. One of my favorite twists is adding a teaspoon of peppermint extract to the filling for a cool, refreshing treat that feels very festive. You can also add a bit of orange zest to the chocolate dough to give it a bright, citrusy note that pairs beautifully with the dark cocoa. For those who love a pop of color, try adding a drop of food coloring to the filling for birthday parties or holidays.
If you’re feeling adventurous, you can try a peanut butter filling by replacing half the butter in the cream recipe with creamy peanut butter. It creates a rich, savory-sweet combination that is absolutely addictive. If you enjoy experimenting with different styles, you might want to look at our Seasonal Cookie Design page for more ideas on how to decorate and flavor your bakes. Another popular choice is the “Double-Stuffed” version; simply double the filling recipe and pile it high between the wafers for that extra indulgent bite.
How to Serve These Sweet Treasures

These Oreo Copycat Cookies are best served with a tall, cold glass of milk. There is something truly timeless about the ritual of dunking a chocolate cookie until it’s just the right level of soft. They also make a wonderful addition to a dessert board alongside some fresh berries and a few pieces of dark chocolate. If you are hosting a gathering, consider serving them with a hot cup of coffee or a spiced chai tea; the bitterness of the drink brings out the rich cocoa notes in the cookie.
For a special touch, you can crumble a few of these cookies over vanilla bean ice cream or use them as a base for a homemade cheesecake crust. They are versatile enough to be the star of the show or a supporting player in a larger dessert. If you are looking for ways to present your cookies with style, our guide on Effortless Cookie Elegance offers great tips on plating and gifting. No matter how you serve them, the most important part is sharing them with people you love.
The Comfort Truth of Homemade Baking
Baking these Oreo Copycat Cookies at home is a reminder that the best things in life often come from our own kitchens. Taking the time to measure, mix, and assemble these treats is a way to honor the traditions of the past while making something fresh for today. I hope these cookies bring a bit of joy and a familiar hug to your home, just like they do to mine. If you find yourself craving more chocolatey goodness, don’t miss our latest Trending Cookie Creations for more flavor sense. Happy baking, y’all! Make sure to share your results with me on Instagram, Facebook, or Pinterest.

