Growing up in a house where the changing of seasons was always marked by the scent of baking butter, these Spring Flower Cookies hold a special place in my heart. There is a certain quiet joy in pulling out the old cookie press, hearing that rhythmic click as each little dough blossom lands on the tray. It is a tradition that feels like home, reminding us that even the simplest treats can bring a bit of sunshine into the kitchen when the flowers outside start to bloom.

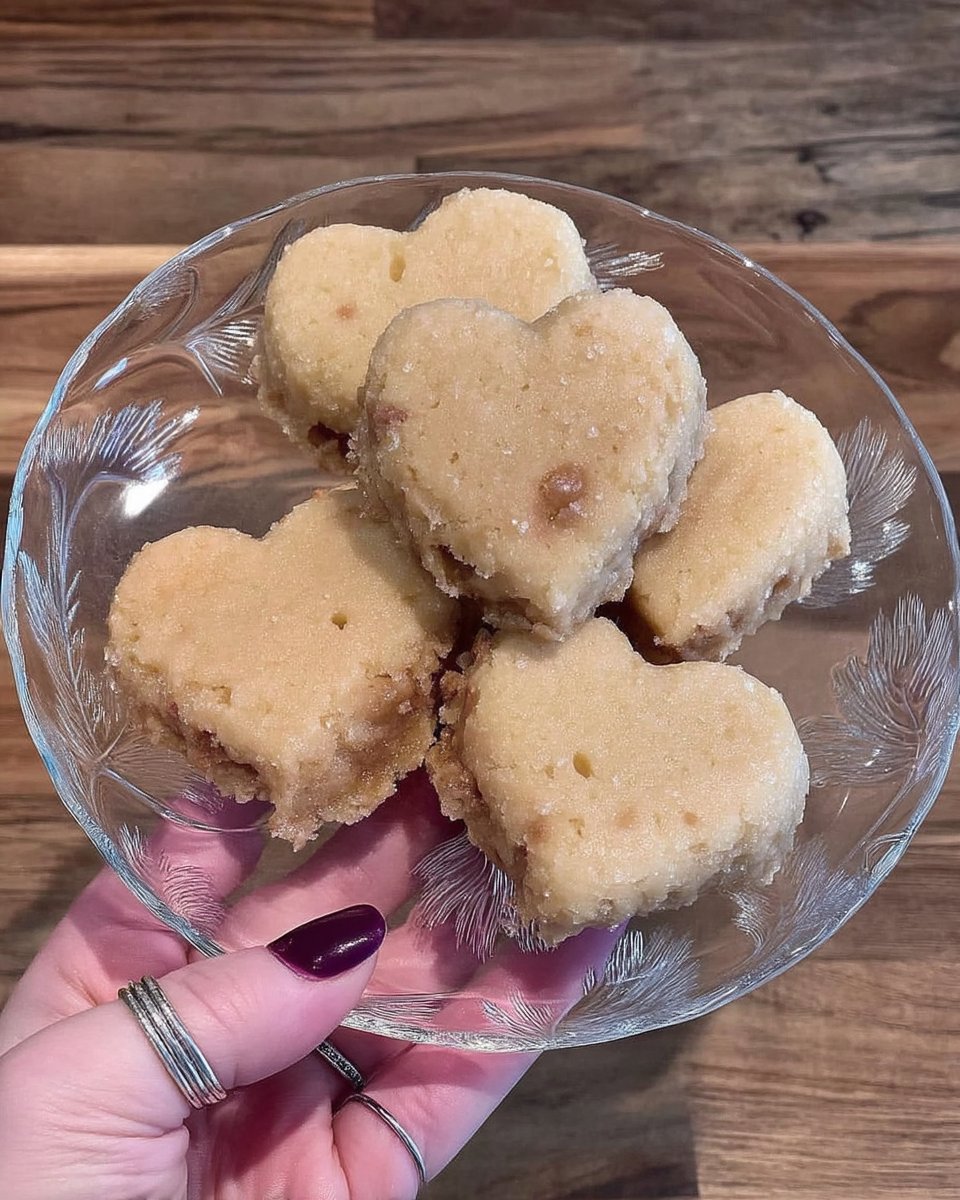
These little delights are more than just a pretty face; they are the quintessential buttery spritz cookie with a cheerful seasonal twist. With a tender crumb that melts on your tongue and a festive candy center, they offer a familiar comfort that guests and family alike will treasure. Whether you are hosting a garden party or just want a sweet companion for your afternoon tea, these cookies are a reliable way to celebrate the warmth of spring.
A Classic Twist on Seasonal Joy
You will find that these cookies represent the perfect balance between a nostalgic classic and a fresh, colorful celebration. The texture is exactly what a spritz cookie should be—buttery, slightly crumbly without being dry, and delicately sweet. Because we use confectioner’s sugar instead of granulated sugar, the crumb is remarkably fine, allowing the cookie to practically dissolve the moment you take a bite. It is a sensory experience that feels like a warm hug from a Southern kitchen.
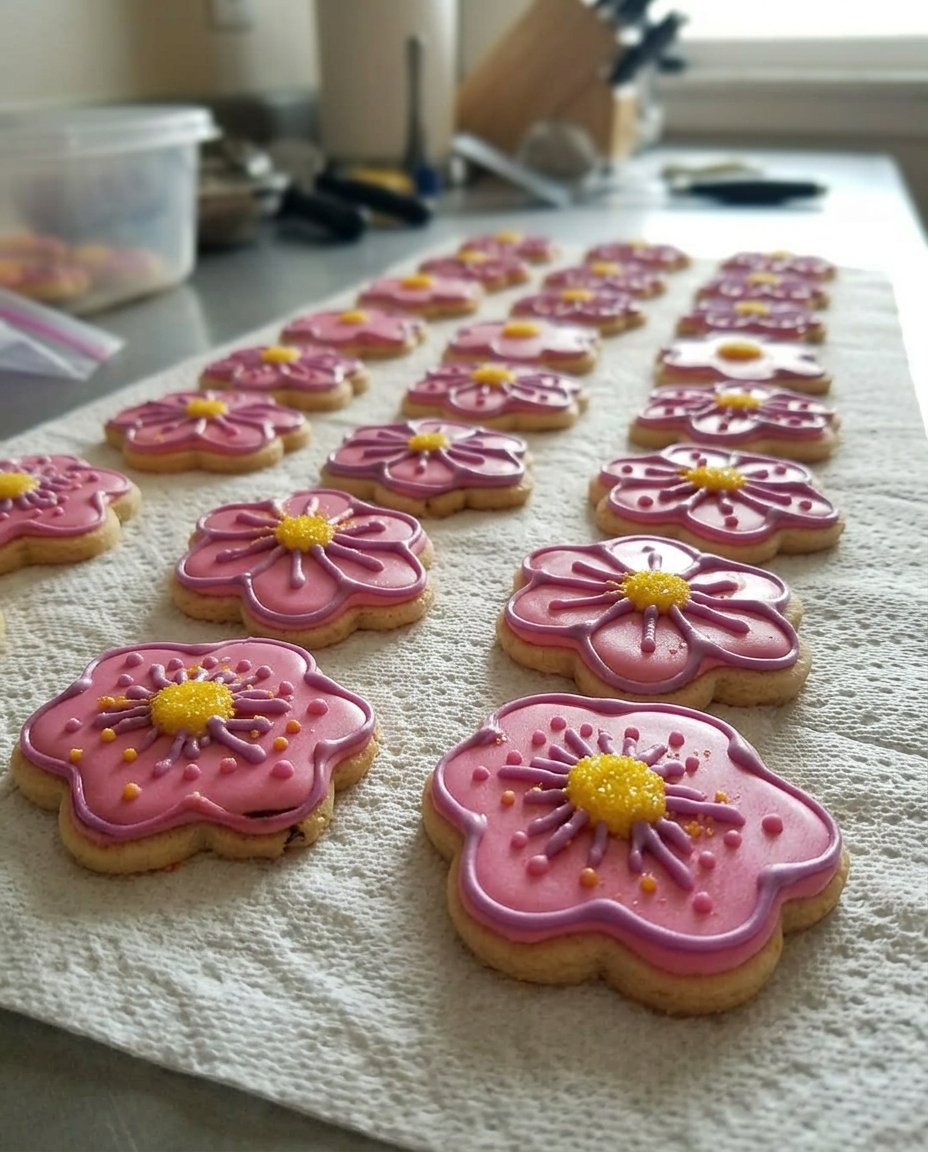
Beyond the flavor, the visual appeal of these Spring Flower Cookies is simply undeniable. The use of a cookie press allows you to create uniform, professional-looking shapes with minimal effort, making them a wonderful choice for gifting. Topping each flower with a candy-coated chocolate egg adds a festive pop of color and a tiny bit of extra sweetness that ties the whole treat together. It is a recipe that proves you do not need complicated techniques to create something truly special and memorable for your loved ones.
In our family, we believe that the best recipes are the ones that encourage us to slow down and enjoy the process. Pressing these cookies is a meditative task that invites you to focus on the rhythm of the kitchen. There is no need for fancy decorations or hours of piping icing; the beauty is built right into the dough. This approach to baking—finding wonder in the familiar and comfort in the craft—is exactly why this recipe has become such a cherished staple in my collection.
Print
Spring Flower Cookies
- Total Time: 30 mins
- Yield: 48 cookies
- Diet: Vegetarian
Description
These delicate Spring Flower Cookies are classic buttery spritz treats featuring a fine, melt-in-your-mouth crumb. Topped with festive chocolate eggs, they offer a cheerful and elegant addition to any seasonal celebration or afternoon tea.
Ingredients
- 1 cup unsalted butter, softened
- 1 cup confectioner’s sugar
- 1 large egg
- 1 teaspoon vanilla extract
- 2 1/4 cups all-purpose flour
- 1/2 teaspoon baking powder
- 1 bag Cadbury Mini Eggs
Instructions
- Preheat your oven to 350 degrees F (175 degrees C) and line baking sheets with silicone mats.
- In a large bowl, cream together the softened butter and confectioner’s sugar for about two minutes until smooth.
- Beat in the egg and vanilla extract until fully incorporated.
- Sift the flour and baking powder together, then gradually mix into the butter mixture on low speed until a soft dough forms.
- Load the dough into a cookie press fitted with a flower-shaped disc.
- Press cookies onto the prepared baking sheets, leaving about one inch of space between each.
- Gently press one Cadbury Mini Egg into the center of each flower.
- Bake for 7 minutes or until firm; the tops should not brown. Let cool on the sheet for 2 minutes before transferring to a wire rack.
Notes
For the cleanest shapes, ensure your baking sheets are completely cool before pressing a new batch of dough onto them. If you do not have silicone mats, use ungreased aluminum cookie sheets to help the dough ‘stick’ to the pan while pressing.
- Prep Time: 15 mins
- Cook Time: 7 mins
- Category: Dessert
- Method: Baking
- Cuisine: American
Simple Ingredients for a Spectacular Result
To make these delightful Spring Flower Cookies, you will need a handful of high-quality staples that you likely already have in your pantry. Each ingredient plays a vital role in achieving that signature melt-in-your-mouth texture that we all love in a good spritz.
- Unsalted Butter: This is the heart of the cookie. Make sure it is properly softened to room temperature so it creams perfectly with the sugar, creating a light and airy base.
- Confectioner’s Sugar: Also known as powdered sugar, this is the secret to the silky, tender crumb. It blends into the butter more smoothly than granulated sugar, resulting in a delicate finish.
- Large Egg: The egg acts as the binder, giving the dough just enough structure to hold its shape during the pressing and baking process.
- Vanilla Extract: A splash of quality vanilla provides that warm, aromatic backbone that makes the buttery flavor truly sing.
- All-Purpose Flour: This provides the foundation. We want just enough to give the cookie body without making it heavy or tough.
- Baking Powder: A tiny bit of leavening helps the cookies expand just enough to be light, without losing the sharp detail of the flower shape.
- Cadbury Mini Eggs: These are the crowning glory. Their pastel shells and milk chocolate centers provide the perfect visual and flavorful finish for a spring-themed treat.
When you gather these ingredients, you are not just preparing a recipe; you are preparing a moment of shared joy. I always recommend using the best butter you can find, as its flavor will be the most prominent note in the finished cookie.
The Comfort Method for Perfect Petals
Step 1: Prepare Your Space
Before you begin mixing, preheat your oven to 350 degrees F (175 degrees C). Preparing your environment is the first step toward a successful bake. Line your baking sheets with silicone baking mats. These mats are particularly helpful for spritz cookies because they provide a slight ‘grip’ that helps the dough release from the press while also preventing the bottoms from browning too quickly.
Step 2: Cream the Butter and Sugar
In a large mixing bowl, combine your softened butter and the confectioner’s sugar. Using a hand mixer or a stand mixer, beat them together for about two minutes. You are looking for a mixture that is smooth and well-combined. This step is where you build the foundation of the cookie’s texture, so take your time to ensure no lumps of sugar remain.
Step 3: Incorporate the Aromatics
Add the large egg and the teaspoon of vanilla extract to your creamed mixture. Continue to beat until the egg is completely incorporated and the batter looks uniform. You might notice the scent of the vanilla starting to fill your kitchen—this is one of my favorite parts of the process, as it signals that something wonderful is being made.
Step 4: Sift and Combine Dry Ingredients
In a separate small bowl, sift together your all-purpose flour and the baking powder. Sifting is a small but important step that prevents clumps and keeps the dough light. Gradually add the flour mixture to your wet ingredients, beating on a low speed until just combined. Be careful not to overmix here; you want a soft, pliable dough that is uniform but hasn’t been overworked.
Step 5: Load the Cookie Press
Choose your favorite flower-shaped disc and fit it into your cookie press. Carefully load the dough into the barrel of the press. Make sure there are no large air pockets, as these can cause the cookies to come out unevenly. This part of the process always feels a bit like a craft project, and it is a great time to involve little helpers in the kitchen.
Step 6: Press the Cookies
Position the press flat against the silicone mat on your prepared baking sheet. Pump the handle once to release a cookie, then lift the press straight up. Leave about one inch of space between each cookie. Because these cookies do not spread much, you can fit quite a few on a single sheet, which is perfect for making large batches for sharing.
Step 7: Add the Chocolate Centers
Take your Cadbury Mini Eggs and place one in the center of each pressed flower. Give it a very gentle press so it nestles into the dough without flattening the cookie. This simple addition transforms the dough from a simple shape into a recognizable spring bloom, adding a touch of whimsy to your tray.
Step 8: Bake and Cool
Bake the cookies for approximately 7 minutes. Keep a close eye on them; you want them to be set and firm, but they should not brown at all on the top. The bottoms should be just barely golden. Allow them to rest on the baking sheet for 2 minutes before transferring them to a wire rack. This brief rest helps the cookies firm up so they do not crumble when moved.
Jesse’s Tips for Success
Achieving the perfect spritz requires a little bit of intuition regarding dough temperature. If your kitchen is very warm and the dough becomes too soft, it may not hold its shape or release cleanly from the press. In this case, you can chill the loaded press for five to ten minutes to firm things up. Conversely, if the dough is too cold, it will be difficult to squeeze out. The goal is a consistency that feels like soft playdough. For more ideas on handling delicate doughs, you might look through our Artisan Cookie Collection.
Another secret to great Spring Flower Cookies is the surface you press them onto. I find that a clean, ungreased silicone mat works best. If the surface is too greasy, the dough will slide around instead of sticking to the pan when you lift the press. Also, remember to wipe the bottom of your cookie press disc occasionally to remove any stray bits of dough that might interfere with the flower shape.
Other Ways to Bloom
While the classic vanilla butter flavor is a crowd-pleaser, there are many ways to add your own creative spark to this recipe. You might try replacing the vanilla extract with almond extract for a more traditional European spritz flavor, or add a teaspoon of finely grated lemon zest to the dough for a bright, citrusy note that screams spring. If you want to see how we handle other seasonal treats, check out our guide on Seasonal Cookie Design.
For those who love a bit of extra color, you can divide the dough into separate bowls and add a drop of gel food coloring to each. Pastel pinks, blues, and yellows make for a stunning presentation. You could also swap the chocolate eggs for a candied cherry or a simple dollop of fruit preserves in the center. The possibilities are as endless as the flowers in a meadow, and I encourage you to make this recipe your own.
Cozy Enjoyment and Sharing
These Spring Flower Cookies are best served in a setting that matches their cheerful nature. I love to pile them high on a vintage floral platter and serve them alongside a pot of Earl Grey tea or a cold glass of milk. They are the perfect size for a light snack, making them a hit at afternoon gatherings or church socials. For more tips on making your cookie trays look professional yet inviting, explore our section on Effortless Cookie Elegance.
Because they are so sturdy once cooled, these cookies are also ideal for packaging into tins or decorative bags. They make a thoughtful gift for neighbors or a lovely addition to an Easter basket. There is something truly special about receiving a gift that was handmade with care, and these little blossoms carry that message perfectly. They stay fresh for up to a week in an airtight container, so you can enjoy the taste of spring for days after baking.
The Comfort Truth of Baking
At the end of the day, baking is about more than just the final product; it is about the stories we tell and the traditions we keep alive. These Spring Flower Cookies represent that intersection of familiar comfort and seasonal excitement that I strive for in every recipe. I hope they find a place in your kitchen and bring a smile to those who share them with you. For more creative ways to finish your bakes, don’t miss our Cookie Decorating Studio. For more inspiration, you can also see how others enjoy springtime flower cookies.
I would love to see how your cookies turned out! Feel free to share your photos and stories with our community on Pinterest, Instagram, or Facebook. Happy baking, and may your kitchen always be filled with the warmth of a Southern spring.
